World of Warcraft bot for MacOS
Before we start, a quick note for any friends over at Blizzard: sorry for taking a stroll on the dark side once more. I still love you! And before you ask: no, I'm not distributing the bot, nor am I actually using it myself - read on for more details!
Back in high school and college, I built bots and automations for World of Warcraft on Windows using AutoIT. It's always been a fun development challenge to see what I could automate in the game and how I'd have to go about it.
I really liked AutoIT because it was very easy to get started, made creating UIs quite simple, and gave you access to very useful Windows APIs for automation purposes.
When I got rid of my PCs and started playing on my Mac computers however, AutoIT stopped being an option. And after looking around, I never quite managed to find any good alternative for it on MacOS. Detecting the colour of specific pixels on the screen and sending mouse/keyboard inputs to other applications always seemed too complicated or too slow for such endeavours.
But earlier in 2026, when Classic TBC was re-released, I started playing again and eventually did a few more searches... that's when I stumbled upon sendkeys: a MacOS CLI application that allows you to send mouse and keyboard inputs to other applications. So with half of the problems solved, I started prototyping a basic bot.
I relied heavily on Copilot and Claude Code to do most of the grunt work. I already knew what I wanted, and had, for the most part, built it before, so I just wanted to get the basics up and running quickly. In retrospect, it made so many mistakes that it might've been wiser and faster to just code it manually... but hey, ✨AI✨.
After a while, I managed to get everything to run fairly smoothly. My very own WoW pixel bot, running on MacOS!
I won't dive into every bit of code and the various iterations it took to get it running. Instead, I'll just give you a brief summary of the bot's features, and an overview of the interesting technical bits.
Enjoy!
Features
- Routes & Navigation
- In-game UI to create and export any number of grinding routes;
- Support for vendor / repair sub-routes;
- Support for graveyard / resurrection sub-routes;
- Stuck character detection with automatic recovery patterns;
- Target validation (ignore PvP, tapped or higher level targets, etc.)
- Wrong-map detection and edge navigation
- This means if the bot wanders into an adjacent zone for any reason (ex.: chasing after a mob), it'll be able to go back to the intended zone and route afterwards.
- Character profiles
- Configure a profile per character using JSON files.
- Define rotations for:
- buffing;
- pulling;
- DPS (the main combat rotation);
- finisher (when target is low on health);
- defensive (when you are low on health);
- Define ability cooldowns and ranges.
- Define ability conditions based on HP, mana, and resource thresholds. Ex.:
- only cast "Fire Blast" if the target's health is below 20%;
- never cast mana shield when mana is below 20%;
- never cast "Conjure Food" if we already have more than 20 conjured food items in our bags;
- Define thresholds for eating / drinking between fights.
- Post-Combat
- Looting support
- Skinning support
- This also happens to work for mobs you can herbalism / mine.
- Web monitoring UI, updated in real time.
Interesting technical bits
Building a bot with a PHP brain/server
I already hear the whole internet complaining: WHY WOULD YOU BUILD THIS IN PHP???
Well, first of all I really like PHP. It's my main language, has been for years, and it's super quick to get started and iterate in.
Second, I knew PHP had asynchronous features built-in since Fibers came out a while ago, but I had never played around with these. So I figured this would be a great way to try them out.
Finally, I dabble in small game projects here and there and I always wondered if PHP would be fast enough to be used as a small game server. Once again, this was an opportunity for me to try it out and see how it would perform. Obviously there are no database calls here, and we have to interact with the OS using third-party CLI applications, so it's not at all like a regular game server, but it was still a good project to explore this in.
Communicating data using colours
If you've never looked into pixel bots, this has to be the coolest part of the project.
I first came up with this idea of communicating data using the colour of pixels on my own when I first built a bot for WoW many years ago. I thought it was absolutely brilliant.
As it turns out, I've googled it when I started developing this MacOS version and saw that commercial pixel bots worked exactly like that. So maybe I wasn't quite the first to think of this concept.
A quick side-note: reading and writing to WoW's memory used to be the way to go for building bots. But it's quite complex, requires updating your codebase after every patch, and it's very much detectable by WoW's anti-cheat. That's why this coloured pixel technique is used instead.
In any case, here's a summary of how this works.
A single coloured pixel is defined using the four following channels: RGBA. Each of these is defined using a integer value between 0 and 255. R, G and B define the colour values (red, green and blue, respectively) that make up the actual colour, while the A (alpha) channel defines the opacity.
If you think about it in terms of raw data, that means a single coloured pixel is essentially just 4 bytes of data - it's just that these bytes are being rendered visually. This may seem useless, but if you know the position at which that pixel is shown on the screen, then you can retrieve the colour of that pixel and easily decode it back into 4 bytes of data by looking at its RGBA values.
Side note: in practice, the alpha channel is a bit more complicated to decode, so I personally didn't use it, but if you wanted to, you absolutely could.
Simple values
Let's say you want to communicate the player's health, mana and experience. Assuming you're using the percentage value for each one, that's just three numbers between 0 and 100. Each value is less than 255, so you can use a single channel to "store" each value.
For example:
- Health: 70%
- Mana: 40%
- Experience: 2%
Would give RGB (70, 40, 2), which is this nice brown.
More complex values
3-4 bytes may not seem like a lot when you need to retrieve and communicate the entire game state, but a computer screen has quite a few pixels available, so the possibilities are actually near-endless.
You can use multiple channels for a single value to communicate numbers higher than 255. You can even use multiple pixels to communicate a single value, or for a logical chain of values — text, for example.
For example, if you wanted to communicate a higher number like 10,523 for example. it can't fit in a single byte - that has a maximum integer value of 255. Using 2 bytes, however, increases the max size of the integer you can store all the way up to 65,535 — that is more than enough for our needs here.
If you know a bit about binary already, you know where this is headed. If not, here's a quick overview. To achieve this, what you have to do is:
- convert your value to binary;
- 10,523 becomes 10100100011011
- split the binary value into groups of 8, starting from the right;
- 10100100011011 becomes two groups:
- 101001
- 00011011
- 10100100011011 becomes two groups:
- convert each group back to an integer;
- 101001 becomes 41
- 00011011 becomes 27
- assign each of these to sequential colour channels;
- R channel is set to 41
- G channel is set to 27
There you have it!
Now, if you need to read the value from the colour, all you have to do is retrieve the values, convert each individual channel's value back into binary, concatenate them together, and convert the resulting binary back into an integer.
In this example, we've worked with just two groups/channels, so we only needed one pixel. However, the same approach could be used with any number of pixels: you just treat the R channel of pixel #2 as the "neighbour" of the B channel of pixel #1, and you keep going the same way.
Technically, there are other ways to communicate larger values across multiple channels/pixels, but I found this to be the most efficient and lightweight approach.
Pixel colour detection and decoding on MacOS
Now, encoding data into coloured pixels is very nice, but it's useless if you can't read these colours to retrieve the values.
On Windows, this is incredibly easy: you give some Windows API a screen coordinate, and it instantly returns an accurate colour value. No struggle whatsoever.
On MacOS, this turned out to be... a challenge.
Retrieving colour values
First, you have to figure out how to retrieve a the colour of a pixel at a given coordinate. This is WAY more complicated than it might seem, especially if you need to do this in real-time.
The only suitable approach I've found was to create a tiny Swift tool that:
- starts a screen recording of a specific section of the screen (the section where all of our data pixels appear);
- parses the RGB colour of each pixel on each frame of the recording;
- stores the RGB in a JSON file that the bot can then read.
That's already quite intense: it means you're constantly screen recording while the bot is running. Not great, but it's the only way I found that actually works, so that was that.
However... we're not done yet.
Stabilizing the colour values
As it turns out, the RGB pixel values from that screen recording aren't quite accurate. Perhaps it has to do with colour profiles, True Tone settings, or something of the sort, but no matter how many adjustments I made to try and capture the "real" RGB values that the in-game addon was rendering, they were always a tiny bit off.
In the end, the only workaround I could find was to stick to limit myself to just two possible values per byte: 0, or 255. Anything in between would be rounded towards the nearest of these two values. That means I get a single bit per colour channel - not a byte.
That also means I needed up to 8x more data pixels to communicate a value.
It's an absolute pain, but at least everything works now, right?
Right?
...
not quite.
Deduping Retina artifacts
In addition to the colour values not being accurate, the screen recording also returned the value for a single pixel multiple times in a row. What's worse is that this wasn't consistent, so I couldn't just "always get the first value and skip the second".
I expect this is a Retina scaling related issue, but I couldn't prevent it no matter which screen recording and parsing settings I tried.
The only way I managed to neutralize that issue was to put a gray separator pixel between my data pixels. On the PHP side, when I read the values, I read a single pixel colour, and then ignore any following pixels until I encounter my separator. Rinse, and repeat.
As you might expect, this means even more pixels need to be rendered in-game. Not great, but luckily, pixels are so tiny that you don't really notice them anyway when playing.
![]()
At least, the data pixels now work in a reliable way, so I was finally ready to build the automation logic and start interacting with the game.
Interacting with the game using sendkeys
Having real-time data about the game state is great, but if you can't interact with it, than it's all for naught.
Luckily, the sendkeys CLI application makes this pretty straightforward. You can pass it the name or ID of a running application, along with the input(s) you'd like to send, and it just... does it.
Need a delay between multiple inputs? Keep a key pressed for a duration? Move the mouse? Send inputs even when the application is running in the background? It's all in there, on CLI command away.
No big technical achievements here, just a nice discovery which I thought deserved a shoutout.
Accessibility features
Accessibility is an important consideration for any type of development. But in this case, accessibility features also happened to make automation a lot easier.
The "Interact Key" feature allows to you automatically interact with nearby interactive elements with a single keypress. This makes looting, skinning, herbing, mining and many other things very easy for botting purposes.
The same concept applies to "Click to Move". When Click to Move is enabled, pressing the interact key when you have an enemy target automatically turns you toward the target and starts moving to them. Very useful for ensuring you're facing the target, and you can easily "approach" them to get in range for your abilities and/or to initiate combat.
Profiles
The bot has some basic behaviours built-in, and some basic keybindings are configured globally (ex.: forward, backward, left and right and movement keys).
However, for the most part, the bot doesn't know how to interact with the game in terms of how to fight, what buffs to apply when, when certain abilities should be used, etc. All of this is configured via a "profile" JSON file. Generally, you'd have one profile configuration per character.
In these files, you can configure:
- Keybinds for your abilities / actions.
- This is expressed in the form of sendkey input definitions, ex.:
- "1" for a basic keyboard button press;
- "<c:2:alt>" for a keyboard input with modifiers;
- "<kd:s><c:f9><p:1.0><ku:s>" for complex sequences with keydown/keyup logic and built-in delays.
- This is expressed in the form of sendkey input definitions, ex.:
- Cooldown duration for your abilities / actions (optional).
- Conditions for when a certain ability or action can be used.
- Ex.: "mana_shield": "player mana > 60"
- Pre-defined rotations to use in various scenarios (buff, pull, dps, defensive, finisher).
- These are defined as arrays of ability/action names.
- By default, if an ability is on cooldown, it will be skipped.
- A "!" prefix can be used to force the bot to wait until said ability is off cooldown before continuing with the rotation.
- Ranges for abilities
- This is used to know if the target is in range of said ability before using it.
- Thresholds for when we should regen, both in and out of combat.
Here is an example of a profile I create for a mage:
{
  "keybinds": {
    "_target": "<c:f8>",
    "health_potion": "0",
    "fireball": "1<p:3.5>",
    "frostbolt": "2<p:2.8>",
    "fire_blast": "3",
    "conjure_food": "<c:-><p:3.5>",
    "conjure_water": "<c:=><p:3.5>",
    "wand": "q<p:1.5>",
    "arcane_intellect": "<c:3:alt><p:1.5>",
    "frost_armor": "<c:4:alt><p:1.5>",
    "polymorph": "<c:f1>",
    "evocation": "<c:2:alt>",
    "frost_nova": "<c:f9>",
    "frost_nova_backaway": "<kd:s><c:f9><p:1.0><ku:s>",
    "conjure_mana_gem": "<c:f5><p:3>",
    "mana_shield": "<c:1:alt>",
    "mana_gem": "9"
  },

  "cooldowns": {
    "health_potion": 120,
    "face_target": 5,
    "fire_blast": 8,
    "mana_shield": 10,
    "frost_nova": 21,
    "frost_nova_backaway": 21,
    "mana_gem": 120
  },

  "conditions": {
    "fireball": "player mana >= 10",
    "frostbolt": "player mana >= 10",
    "fire_blast": "player mana >= 10",
    "conjure_food": "player food < 20",
    "conjure_water": "player water < 20",
    "conjure_mana_gem": "player mana_gem < 1",
    "mana_gem": "player mana <= 20",
    "mana_shield": "player mana > 60"
  },

  "rotations": {
    "buff": [
      "frost_armor",
      "arcane_intellect",
      "conjure_mana_gem",
      "conjure_water",
      "conjure_water",
      "conjure_water",
      "conjure_water",
      "conjure_water",
      "conjure_water",
      "conjure_water",
      "conjure_food",
      "conjure_food",
      "conjure_food",
      "conjure_food",
      "conjure_food",
      "conjure_food"
    ],
    "buff_always": [
      "mana_shield"
    ],
    "pull": [
      "face_target",
      "frostbolt",
      "frostbolt"
    ],
    "dps": [
      "frostbolt",
      "frostbolt",
      "mana_gem",
      "frostbolt",
      "face_target"
    ],
    "finisher": [
      "fire_blast",
      "wand"
    ],
    "defensive": [
      "health_potion",
      "mana_gem",
      "mana_shield",
      "face_target",
      "frost_nova_backaway",
      "fire_blast",
      "mana_gem",
      "frostbolt",
      "wand"
    ],
    "navigating": [
    ]
  },

  "ranges": {
    "fireball": 35,
    "frostbolt": 30,
    "fire_blast": 20,
    "wand": 30
  },

  "thresholds": {
    "out_of_combat_health_regen": 70,
    "out_of_combat_mana_regen": 50,
    "out_of_combat_health_regen_satisfied": 90,
    "out_of_combat_mana_regen_satisfied": 90,
    "in_combat_health_regen": 40,
    "in_combat_mana_regen": 5
  }
}
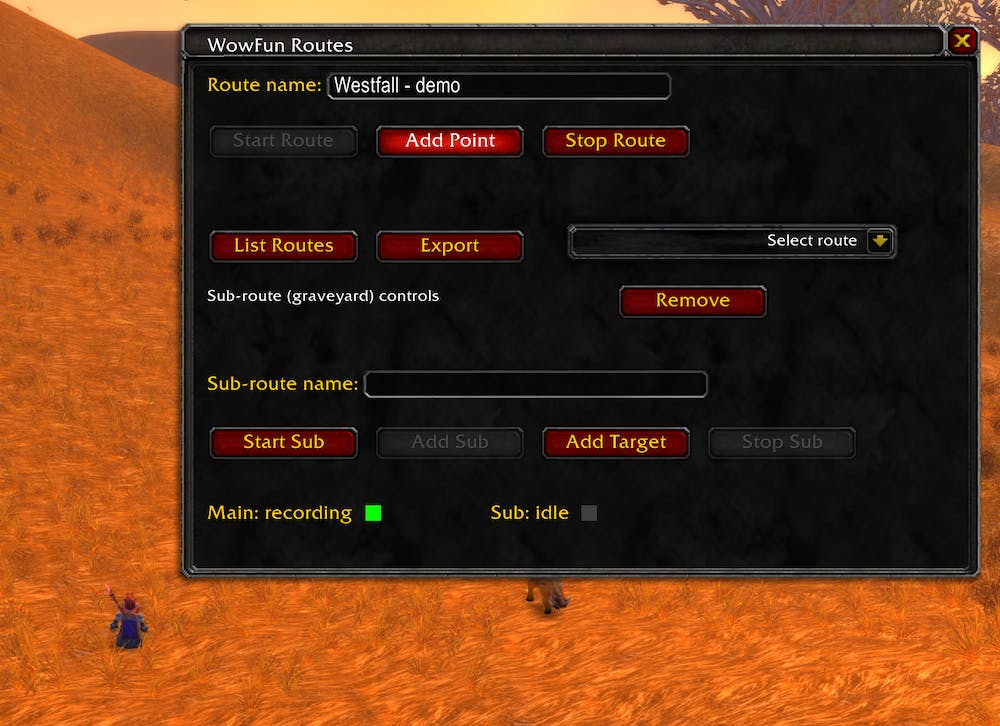
Routes
The routes are simply JSON files, which contain:
- A map ID or list of map IDs.
- A main route, as an array of map coordinates that defines a path or a loop.
- A list of sub-routes for nearby vendors and graveyards.
- Sub-routes are just like the main route: a list of map coordinates.
- Each sub-route has a name, using prefixes to define their function.
- "gy_" prefix indicates this is a graveyard sub-route;
- "vendor_" or "repair_" prefix indicates this is a repair/vendor sub-route.
- These can optionally contain a list of NPC names and locations.
The in-game addon contained a basic interface to allow us to create these routes easily by simply moving around the world and clicking button to record the coordinates along the route, and to record the name & position of NPCs we are targeting for sub-routes.
Here is an example of a small route with vendors and graveyards:
{
  "name": "Elwynn - Maclure Vineyards boars",
  "mapId": 1429000,
  "points": [
    {"x": 41.6, "y": 85.1, "z": 0.000},
    {"x": 41.9, "y": 85.4, "z": 0.000},
    {"x": 42.2, "y": 85.9, "z": 0.000},
    {"x": 42.2, "y": 86.3, "z": 0.000},
    {"x": 42.3, "y": 86.8, "z": 0.000},
    {"x": 42.3, "y": 87.4, "z": 0.000},
    {"x": 42.1, "y": 88.1, "z": 0.000},
    {"x": 41.8, "y": 88.4, "z": 0.000},
    {"x": 41.4, "y": 88.3, "z": 0.000},
    {"x": 41.0, "y": 88.7, "z": 0.000},
    {"x": 40.8, "y": 89.2, "z": 0.000},
    {"x": 40.6, "y": 89.4, "z": 0.000},
    {"x": 40.1, "y": 89.3, "z": 0.000},
    {"x": 39.8, "y": 89.2, "z": 0.000},
    {"x": 39.4, "y": 88.9, "z": 0.000},
    {"x": 39.0, "y": 88.8, "z": 0.000},
    {"x": 38.6, "y": 88.7, "z": 0.000},
    {"x": 38.1, "y": 88.6, "z": 0.000},
    {"x": 37.6, "y": 88.4, "z": 0.000},
    {"x": 37.1, "y": 88.3, "z": 0.000},
    {"x": 36.6, "y": 88.3, "z": 0.000},
    {"x": 36.2, "y": 88.1, "z": 0.000},
    {"x": 35.9, "y": 87.8, "z": 0.000},
    {"x": 35.4, "y": 87.4, "z": 0.000},
    {"x": 35.0, "y": 87.1, "z": 0.000},
    {"x": 34.6, "y": 86.9, "z": 0.000},
    {"x": 34.3, "y": 86.6, "z": 0.000},
    {"x": 33.9, "y": 86.2, "z": 0.000},
    {"x": 33.5, "y": 86.3, "z": 0.000},
    {"x": 33.2, "y": 86.6, "z": 0.000},
    {"x": 32.8, "y": 86.8, "z": 0.000},
    {"x": 32.4, "y": 86.6, "z": 0.000},
    {"x": 32.1, "y": 86.2, "z": 0.000},
    {"x": 31.8, "y": 85.8, "z": 0.000},
    {"x": 31.9, "y": 85.4, "z": 0.000},
    {"x": 32.0, "y": 84.8, "z": 0.000},
    {"x": 32.3, "y": 84.3, "z": 0.000},
    {"x": 32.6, "y": 84.1, "z": 0.000},
    {"x": 33.0, "y": 84.2, "z": 0.000},
    {"x": 33.3, "y": 84.8, "z": 0.000},
    {"x": 33.3, "y": 84.8, "z": 0.000}
  ],
  "subroutes": [
    {"name": "vendor_01", "attachIndex": 39, "attachDistance": 1.4764823060233, "points": [
      {"x": 33.3, "y": 84.8, "z": 0.000},
      {"x": 33.3, "y": 84.2, "z": 0.000},
      {"x": 33.4, "y": 83.6, "z": 0.000},
      {"x": 33.7, "y": 82.9, "z": 0.000}
    ],
    "npcs": [
      {"name": "Homer Stonefield", "x": 33.7, "y": 82.9, "z": 0.000}
    ]
    },
    {"name": "vendor_02", "attachIndex": 8, "attachDistance": 1.1661903789691, "points": [
      {"x": 41.7, "y": 87.8, "z": 0.000},
      {"x": 41.9, "y": 88.2, "z": 0.000},
      {"x": 42.1, "y": 88.7, "z": 0.000},
      {"x": 42.2, "y": 89.0, "z": 0.000},
      {"x": 42.4, "y": 89.4, "z": 0.000}
    ],
    "npcs": [
      {"name": "Joshua Maclure", "x": 42.4, "y": 89.4, "z": 0.000}
    ]
    },
    {"name": "gy_01", "attachIndex": 40, "attachDistance": 0.7211102550928, "points": [
      {"x": 39.3, "y": 60.4, "z": 0.000},
      {"x": 39.1, "y": 61.1, "z": 0.000},
      {"x": 39.1, "y": 62.1, "z": 0.000},
      {"x": 39.1, "y": 63.2, "z": 0.000},
      {"x": 39.0, "y": 64.1, "z": 0.000},
      {"x": 39.0, "y": 65.2, "z": 0.000},
      {"x": 39.0, "y": 66.1, "z": 0.000},
      {"x": 39.0, "y": 66.6, "z": 0.000},
      {"x": 38.7, "y": 67.0, "z": 0.000},
      {"x": 38.3, "y": 67.6, "z": 0.000},
      {"x": 37.8, "y": 68.1, "z": 0.000},
      {"x": 37.4, "y": 68.6, "z": 0.000},
      {"x": 37.3, "y": 68.9, "z": 0.000},
      {"x": 37.1, "y": 69.6, "z": 0.000},
      {"x": 37.1, "y": 70.0, "z": 0.000},
      {"x": 37.1, "y": 70.7, "z": 0.000},
      {"x": 37.0, "y": 72.1, "z": 0.000},
      {"x": 36.9, "y": 73.1, "z": 0.000},
      {"x": 36.8, "y": 74.0, "z": 0.000},
      {"x": 36.7, "y": 75.2, "z": 0.000},
      {"x": 36.8, "y": 76.0, "z": 0.000},
      {"x": 36.8, "y": 77.1, "z": 0.000},
      {"x": 36.8, "y": 77.9, "z": 0.000},
      {"x": 36.7, "y": 78.6, "z": 0.000},
      {"x": 36.4, "y": 79.4, "z": 0.000},
      {"x": 35.9, "y": 79.6, "z": 0.000},
      {"x": 35.4, "y": 80.1, "z": 0.000},
      {"x": 34.8, "y": 80.7, "z": 0.000},
      {"x": 34.3, "y": 81.3, "z": 0.000},
      {"x": 33.8, "y": 81.7, "z": 0.000},
      {"x": 33.3, "y": 82.0, "z": 0.000},
      {"x": 32.7, "y": 82.3, "z": 0.000},
      {"x": 32.3, "y": 82.9, "z": 0.000},
      {"x": 32.2, "y": 83.6, "z": 0.000},
      {"x": 32.5, "y": 84.4, "z": 0.000},
      {"x": 32.7, "y": 85.1, "z": 0.000},
      {"x": 32.7, "y": 85.2, "z": 0.000}
    ],
    "npcs": [ ]
    }
  ]
}
Web monitoring UI
 The web monitoring UI is one of the simplest parts of the project, but it's still a neat feature.
Basically, a web server has an API endpoint that accepts requests containing the current game state as JSON.
The bot sends that game state every few seconds, and a basic HTML & JS web page displays the information, polling the web server for updates every few seconds.
There are two interesting sections here that I think are worth talking about a bit more.
First, the target's name and picture.
This doesn't come straight from the WoW client - instead, we receive the ID of the mob from the bot, and we simply make an HTTP request to the Wowhead page for that mob ID (proxied by the web server to avoid CORS issues), giving us a name and image that we store in a local cache and display in the UI.
The second interesting bit is the map.
The image itself couldn't be reliably sourced dynamically like with the mobs, so I simply found and downloaded the image of every map available in Classic TBC, and saved it using the map ID as the image name for easy lookups.
This map UI also shows the route that the bot is currently running, including all of its sub-routes, as well as the player's position (and corpse position, if the player is currently dead). Seeing as routes and sub-routes are just a list of "coordinates" which are actually based on percentages of the width & height of the map, it was very easy to automatically generate an SVG with each point of the route rendered as a dot, with a line in-between each point.
Conclusion
Overall, this was a really fun project to work on.
I liked watching the whole thing work, analyzing its behaviour and its logs to try and detect issues and improve it over time. However, after a few weeks, it became was stable enough that it didn't really need more improvements, so I stopped working on it. And when I stopped working on it, I stopped using it altogether.
Levelling characters for the sake of levelling characters isn't very fun, and neither is grinding gold or professions in a game I don't have much time to really play as I would like to.
So, with the development challenge completed, botting is once again out of the picture for me.